

Let’s walk through how to create a timeline, using scrolltrigger, and useGSAP in Next.js. For more on GSAP, refer to their amazing YouTube channel, and specifically, this tutorial.
The goal of this code originally was understand how to command elements to move when user scrolls, to create a panning effect.
- User scrolls down
- Sky background image scrolls down (giving illusion of camera panning up)
- Mountain background image scrolls down and left out of frame
- Mountain foreground image scrolls down and right out of frame
Basic steps of this tutorial:
- Start your project with Next.js
- Install dependencies
- Create a new GSAP effect on scroll in a new component
- Follow along, or download this demo is available on github for download, here.
Start your project with Next.js
If you aren’t familiar with Next.js, their documentation is stellar and you can follow their docs ( which are incredible 🙌 )
So if you haven’t done so already,
npx create-next-app@latest(to get the party started) From there, install the dependencies,
npm install gsap
npm install @gsap/react
Now you’re ready.
Create a new component
Create a folder called “components” in the root directory of the app and inside, create a file called Landscape.js,
The file will "use client" (?) because unlike server-side rendering, this component will render changes from the browser, based on how the user interacts with it. In this case, scrolling. Atop the file, let’s import our dependencies to the new Landscape.js component,
import gsap from 'gsap';
import { useGSAP } from '@gsap/react';
import { ScrollTrigger } from "gsap/ScrollTrigger";
import Image from 'next/image';

// register the GSAP plugins

gsap.registerPlugin(ScrollTrigger);
gsap.registerPlugin(useGSAP);
Next, create the skeleten of a basic exported component as arrow function, set to return some HTML/JSX
const Landscape = () => {

  useGSAP(() => {
    // scrolltrigger stuff in here
  });

  return (
     // HTML and JSX in here
  )
}

export default Landscape;
You’ll see we’re using the useGSAP() method over useEffect() or useLayoutEffect(), which is explained in the linked video above. But basically we prefer using useGSAP() over the Next.js methods (which are similar to componentDidMount() in React…) due to the nature of React being a declarative framework, and GSAP being imperative. You have the option to extend this and pass context, but that’s not needed in this particular demo.
Next, we’ll create the HTML for the sky and the mountains, which will be added in the component’s return() function,
    <div className="wrapper">
      <div className="baa-sky baa-inner">
        <Image
          src="/viafoci-scrolltrigger-sky-dark.jpg"
          alt="Sky"
          className="sky"
          width={1400}
          height={1890}
          priority
        />
      </div>
      <div className="baa-bg baa-inner">
        <Image
          src="/viafoci-mtns-bg-dark-1400x390.png"
          alt="Landscape Background"
          width={1400}
          height={390}
          priority
        />
      </div>
      <div className="baa-fg baa-inner">
        <Image
          src="/viafoci-mtns-fg-dark-1400x536.png"
          alt="Landscape Foreground"
          width={1400}
          height={536}
          priority
        />
      </div>
    </div>
Basically – we have a .wrapper class, with three nested images. If you look closely, you’ll notice the sky image has portrait dimensions unlike the mountains which are landscape. With CSS, we’re going to place these elements as if they are pieces of felt on top of a felt board, stacked atop eachother using the z-index CSS property, fixed to the viewport frame.
I’m using a .baa-inner class for each of the image wrappers, to setup shared styling for the fixed, stacked, “felt pieces”. Then I’m using a unique class for each of the targets to assign their specific positioning with top/left etc.
Here’s a breakdown of the strategy in a diagram.
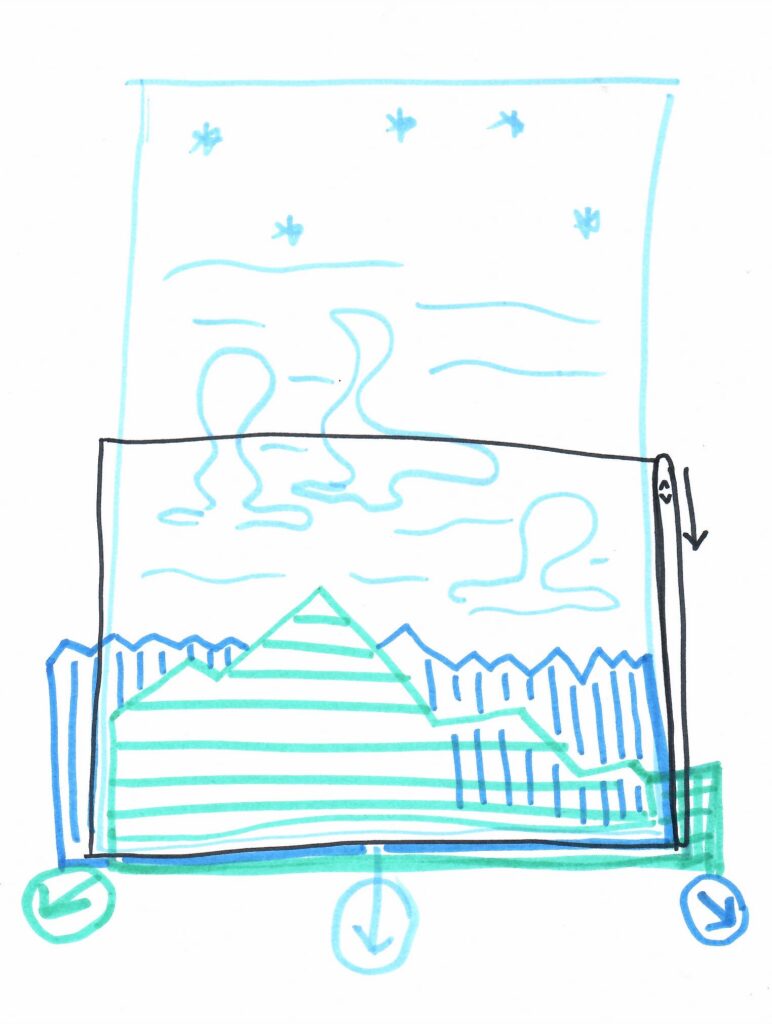
We’re used to things scrolling “up & out” of the viewport, as we scroll down a page, so I wanted to disrupt the user’s experience by having things move in a different direction when the user scrolls down.
One thing to note, is you may interpret the sky (light blue) image in the above diagram, to be fixed to the top of the viewport, but pulled -100vh top. this is because when you fix elements to the bottom of the viewport, it can jump and have weird effects when the nav bar on mobile collapses/expands after scroll.
Now that we have our felt boards stacked appropriately (see the global.css for final reference on classes used to apply initial styling to the 3 elements: the sky, background mtns., and foreground mtns.)…
Now we’re ready to animate them on scroll!
So first we need to setup a GSAP .timeline() that we will chain .to() methods to, for animating the elements for a specific period of time (using scrolled pixels for “time”).
To demonstrate mobile versus desktop timelines, we’ll use the .matchMedia() method that gsap comes with, and have an “always” timeline versus a mobile-only timeline.
From above, inside the useGSAP() arrow function, we’ll begin setting up our variables,
let mm = gsap.matchMedia(); As well as,
let foreground_timeline = gsap.timeline();
let landscape_timeline = gsap.timeline();
There are 2 timelines because I’m only going to use the landscape_timeline on mobile-sized devices.
Next, we’ll setup an object to hold the default scrollTrigger values for when the mountains (and sky on desktop) move,
    const skyTrigger = ScrollTrigger.create({
      trigger: wrapper,
      pin: false,
      start: "top top",
      markers: false,
      end: "100vh",
    });
From here, let’s setup a media query and only animate the sky image container on desktop:
    mm.add("(min-width: 768px)", () => {
      landscape_timeline.to(landscape_sky,{
        y:"100vh",
        scrollTrigger:{
          start:() => skyTrigger?.start,
          end:() => skyTrigger?.end,
          scrub:1,
        }
      });
    });
Next, we’ll chain .to() methods to the “default” timeline (rendered on all sizes), to animate the mountains down and out of the frame, when the user scrolls (linked to the scrub property)
    foreground_timeline.to(landscape_mtns_bg,{
      y:"390px",
      x:"44px",
      scrollTrigger:{
        start:() => skyTrigger?.start,
        end:() => skyTrigger?.end,
        scrub:1,
      }
    }).to(landscape_mtns_fg,{
      y:"400px",
      x:"-44px",
      scrollTrigger:{
        start:() => skyTrigger?.start,
        end:() => skyTrigger?.end,
        scrub:1,
      }
    });
In sum, if you want to download the open source scrolltrigger with useGSAP demo ~ feel free! Let me know what you think.
It’s a scrappy demo, though I hope it finds you well!
If you’d like to Buy Me a Coffee because you find this helpful and want to show gratitude because it helped you in some way, you may do so here: